Snowflake
You can use Snowflake in Etleap to:
- Ingest data into your Snowflake warehouse. For more information on using Snowflake as a data warehouse, visit our Connect to a Destination quickstart.
- Build data pipelines with Snowflake as your source.
- Create models and materialized views with your Snowflake tables. Check out this page here for an introduction into Etleap models.
This page focuses on the connection setup required when using Snowflake as a source.
Source Setup
Step 1. Identify Your Snowflake Hostname
To connect Etleap to your Snowflake account, you will need to provide the hostname for your Snowflake instance.
This is in the format of <account_name>.snowflakecomputing.com where <account_name> can be found with the following query:
SELECT CURRENT_ACCOUNT_NAME();Step 2. Create a Database User
To create a user that will allow Etleap to connect to your database, follow the steps below:
-
In your command line, generate a private key for your account. This key will be used during connection setup later.
- To create an unencrypted private key, run the following command:
openssl genrsa 2048 | openssl pkcs8 -topk8 -inform PEM -out snowflake_etleap_key.p8 -nocrypt - To create an encrypted private key with a passphrase, run the following command:
Take note of your passphrase as this will be used later in steps 2 and 9.
openssl genrsa 2048 | openssl pkcs8 -topk8 -v2 des3 -inform PEM -out snowflake_etleap_key.p8
- To create an unencrypted private key, run the following command:
-
In your command line, generate the corresponding public key. If you created your private key with a passphrase in step 1, you will be prompted to provide it here.
openssl rsa -in snowflake_etleap_key.p8 -pubout -out snowflake_etleap_key.pub -
Create a new user in Snowflake for the Etleap connection and assign the public key you generated in step 2. Replace
<PUBLIC_KEY_GENERATED>with your public key, excluding any delimiters and metadata tags.CREATE USER <user_name> RSA_PUBLIC_KEY = '<PUBLIC_KEY_GENERATED>'; -
[Optional] Set the user as a
SERVICEuser.ALTER USER <user_name> SET TYPE = 'SERVICE'; -
Grant the user access to a role that you want to use for Etleap’s privileges. You may want to create a specific role for this.
CREATE ROLE <role_name>; GRANT ROLE <role_name> TO USER <user_name>; -
Grant
USAGEpermission on the database schema andSELECTpermission on the tables to be ingested.GRANT USAGE ON SCHEMA <schema_name> TO ROLE <role_name>; GRANT SELECT ON TABLE <table_name> TO ROLE <role_name>; -
You may also choose to grant access to all future tables.
GRANT SELECT ON ALL FUTURE TABLES IN SCHEMA <schema_name> TO ROLE <role_name>; -
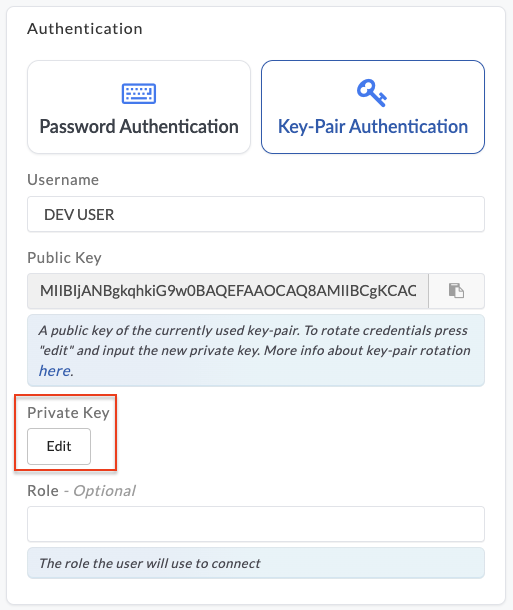
Select Key-Pair Authentication when creating a Snowflake connection in Etleap. When asked, enter the private key from the
snowflake_etleap_key.p8file you generated earlier and your encryption passphrase if applicable.
-
[Optional - Key Pair Rotation] Snowflake allows you to associate two public keys with a user simultaneously using the
RSA_PUBLIC_KEYandRSA_PUBLIC_KEY_2parameters, facilitating key pair rotation . To use key pair rotation with Etleap, follow the steps below:-
Generate a new private and public key set using the above commands.
-
Assign the new public key to the Snowflake user using the parameter that is not currently in use (either
RSA_PUBLIC_KEYorRSA_PUBLIC_KEY_2). For example:ALTER USER <SNOWFLAKE_USER_FOR_ETLEAP> SET RSA_PUBLIC_KEY_2='<PUBLIC_KEY_GENERATED>'; -
Update the private key in Etleap.
-
Remove the old public key from the user profile in Snowflake.
ALTER USER <SNOWFLAKE_USER_FOR_ETLEAP> UNSET RSA_PUBLIC_KEY;
-
You can now set up a new connection in Etleap with this user.
Step 3. Whitelist Etleap’s IP Addresses
Etleap’s IP addresses must be whitelisted in Snowflake. There are different addresses to whitelist depending on your deployment model. Review the IP Whitelisting article for more information on which to use.
Prefer using an API? Go here and select Snowflake under the Body header to create your connection via API.
Type Mapping
The table below shows how Snowflake data types map to Etleap data types.
Mapped Values
| Snowflake Type | Etleap Type |
|---|---|
| BOOLEAN | BOOLEAN |
| VARCHAR | STRING |
| NUMBER | NUMBER |
| INTEGER | NUMBER |
| FLOAT | NUMBER |
| TIMESTAMP | STRING |
| TIMESTAMP_LTZ | STRING |
| TIMESTAMP_NTZ | STRING |
| TIMESTAMP_TZ | STRING |
Unmapped Values
Each type listed below does not have a specified mapping and will default to STRING in Etleap.
- ANY
- BINARY
- DATE
- GEOGRAPHY
- GEOMETRY
- MAP
- OBJECT
- TIME
- VARIANT
Arrays
Arrays of any type are treated as comma-delimited strings in Etleap.