NetSuite
NetSuite connections give you access to your company’s finance, operations, and customer relations data.
Source Setup
Etleap uses Token-based Authentication (TBA) Tasks for Administrators to authenticate your NetSuite account. Please perform the following steps within your Netsuite account to enable API access.
Step 1. Enable TBA
-
Select Setup → Company → Enable Features.
-
Click the SuiteCloud sub-tab.
-
In the SuiteScript section, check the following boxes:
-
Client SuiteScript. Click I Agree on the SuiteCloud Terms of Service page.
-
Server SuiteScript. Click I Agree on the SuiteCloud Terms of Service page.
-
-
In the Manage Authentication section, check the Token-based Authentication Box. Click I Agree on the SuiteCloud Terms of Service Page.
-
Click Save.
Step 2. Create a Role
-
Select Setup → Users/Roles → Manage Roles → New to create a new role for Etleap.
-
Enter a name for the role in the Name field.
-
Select Permissions → Setup near the bottom of the page and expand the drop-down menu to Set system-wide permissions.
-
Select each of the following permissions from the drop-down menu and click Add:
-
Custom Body Fields
-
Custom Column Fields
-
Custom Entity Fields
-
Custom Event Fields
-
Custom Item Fields
-
Custom Record Types
-
Deleted Records
-
SOAP Web Services
-
-
Select each of the following permissions from the drop-down to enable the user to generate and log in with API tokens:
- Access Token Management (optional) - This Allows you to create and revoke access tokens for some users with a TBA-enabled role; Cannot generate access tokens for an administrator; Cannot generate access tokens for their own use; Cannot use access tokens to log in to the API.
- User Access Tokens - This allows users to generate access tokens only for themselves.
- Log in using Access Tokens - This allows users to use access tokens to log in to the API.
-
Set the desired permissions for each table under the Transactions, Lists, Setup, or Custom Record subcategories.
-
Click Save once you have set the required permissions.
Step 3. Set additional table permissions (optional)
Some tables, such as Accounts, require multiple permissions for the role to see all the content in the table. Using Accounts as an example, conduct the following steps to set additional permissions for these types of tables:
- Select Setup → Users/Roles → Manage Roles. Under Manage Roles, click Edit beside the applicable role name.
- Set Your additional permission(s) from the Lists drop-down menu of the Permissions tab.
- Click Add to add the permission.
You can verify whether you added the proper permissions by logging in as a user with the new role and validating if you see all the data that you are expecting.
Step 4. Connect the Role to a User
- Select Setup → Users/Roles → Manage Users.
- Select the relevant user.
- Click Edit.
- Scroll down to the Access tab.
- Make sure the Give Access box is checked. If it is unchecked, you will need to specify a password for the user.
- Expand the Role drop-down list on the Roles tab and select the role you created above.
- Click Add and Save.
Step 5. Create the Netsuite Integration to Verify API Access for Etleap
- Select Setup → Integration → Manager Integrations → Integration → New.
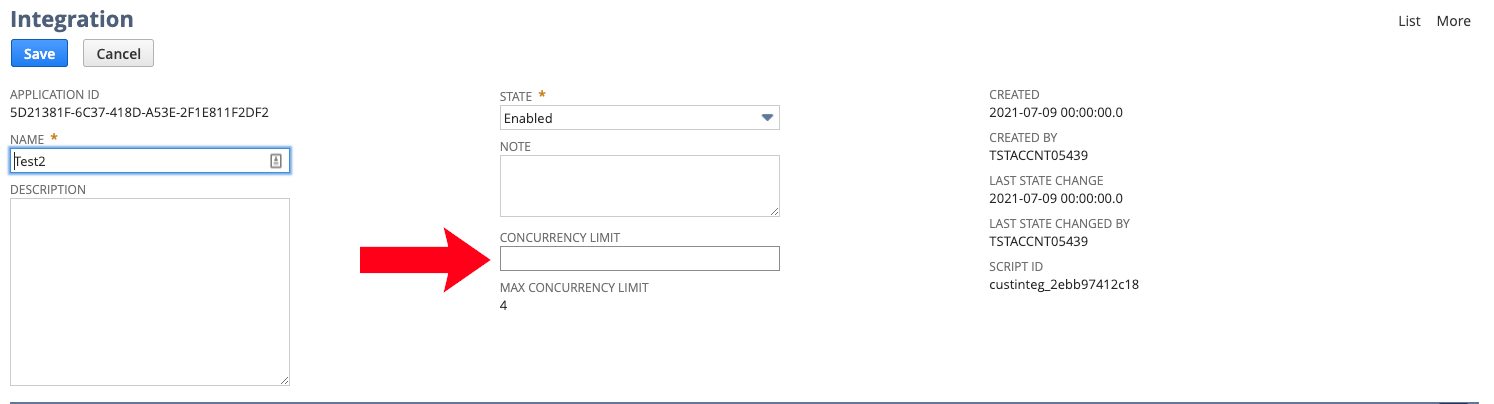
- Set the CONCURRENCY LIMIT. This limit is the Max number of pipelines allowed to run concurrently by the integration. A connection conflict will cause your Etleap pipelines to fail.
- In the Manage Authentication sub-tab, check the Token-Based Authentication box.
- Click Save.
- Copy the CONSUMER KEY and CONSUMER SECRET. For security reasons, the integration credentials will only be displayed once.
Step 6. Create your Access Token
- Log in using the new role with your User Access Token permission.
- In the Settings portlet, click the Manage Access Tokens link.
- Click New My Access Token.
- On the Access Token page:
- Select the Application Name or Integration Record Name.
- The Token Name is already populated with a concatenation of application name, user, and role. Enter your own name for this token if desired.
- Click Save.
- Copy the TOKEN ID and TOKEN SECRET values. For security reasons, the integration credentials will only be displayed once.
Step 7. Obtain your Account ID
- Select Setup → Integration → SOAP Web Services Preferences.
- Copy the ACCOUNT ID in the top-left of the page.
You will need to access the ACCOUNT ID, CONSUMER KEY, CONSUMER SECRET, TOKEN ID, and TOKEN SECRET values when creating a connection in Etleap.
Prefer using an API? Go here and select NetSuite under the Body header to create your connection via API.
What Data is Available?
Update-Mode Deletes Support
Deletes are not supported for update-mode entities with this connector.
You can create NetSuite pipelines with the following entities:
Key Considerations
When creating the Integration Record (see “Create the Integration Record” step on Source Setup), you must configure the CONCURRENCY LIMIT, limiting the number of concurrent pipelines allowed by integration. If there is a conflict between the limit set in NetSuite and Etleap, your Etleap pipelines will fail.