Connection Setup
Etleap connects to your Snowflake database using a JDBC driver. Etleap can use an existing Snowflake database and warehouse.
If you’d like to create a new database or warehouse for Etleap, refer to Snowflake’s CREATE DATABASE and CREATE WAREHOUSE documentation.
Identify Your Snowflake Hostname
To connect Etleap to your Snowflake account, you will need to provide the hostname for your Snowflake instance.
This is in the format of <account_name>.snowflakecomputing.com where <account_name> can be found with the following query:
SELECT CURRENT_ACCOUNT_NAME();Create a Database User
To create a user that will allow Etleap to connect to your database via key-pair authentication , follow the steps below.
Connect with Key-Pair Authentication
Key-pair authentication is recommended when setting up a new Snowflake destination to prepare for Snowflake’s upcoming multi-factor authentication (MFA) enforcement .
-
In your command line, generate a private key for your account. This key will be used during connection setup later.
- To create an unencrypted private key, run the following command:
openssl genrsa 2048 | openssl pkcs8 -topk8 -inform PEM -out snowflake_etleap_key.p8 -nocrypt - To create an encrypted private key with a passphrase, run the following command:
Take note of your passphrase as this will be used later in steps 2 and 9.
openssl genrsa 2048 | openssl pkcs8 -topk8 -v2 des3 -inform PEM -out snowflake_etleap_key.p8
- To create an unencrypted private key, run the following command:
-
In your command line, generate the corresponding public key. If you created your private key with a passphrase in step 1, you will be prompted to provide it here.
openssl rsa -in snowflake_etleap_key.p8 -pubout -out snowflake_etleap_key.pub -
Create a new user in Snowflake for the Etleap connection and assign the public key you generated in step 2. Replace
<PUBLIC_KEY_GENERATED>with your public key, excluding any delimiters and metadata tags.CREATE USER <user_name> RSA_PUBLIC_KEY = '<PUBLIC_KEY_GENERATED>'; -
[Optional] Set the user as a
SERVICEuser.ALTER USER <user_name> SET TYPE = 'SERVICE'; -
Grant the user access to a role that you want to use for Etleap’s privileges. You may want to create a specific role for this.
CREATE ROLE <role_name>; GRANT ROLE <role_name> TO USER <user_name>; -
Grant
USAGEpermission on the warehouse.GRANT USAGE ON WAREHOUSE <warehouse_name> TO ROLE <role_name>; -
Grant the following permissions on the database:
GRANT CREATE SCHEMA, USAGE ON DATABASE <database_name> TO ROLE <role_name>; -
Grant the following permissions on any schemas that you will load to:
GRANT USAGE, CREATE TABLE, CREATE TAG, CREATE ICEBERG TABLE, CREATE VIEW ON SCHEMA <schema_name> TO ROLE <role_name>; -
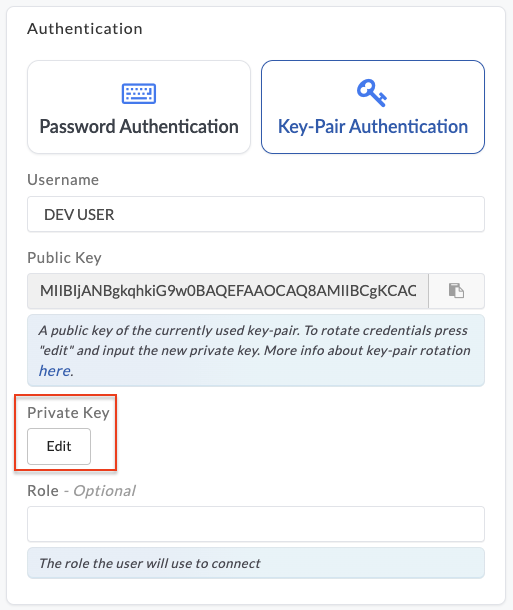
Select Key-Pair Authentication when creating a Snowflake connection in Etleap. When asked, enter the private key from the
snowflake_etleap_key.p8file you generated earlier and your encryption passphrase if applicable.
-
[Optional - Key Pair Rotation] Snowflake allows you to associate two public keys with a user simultaneously using the
RSA_PUBLIC_KEYandRSA_PUBLIC_KEY_2parameters, facilitating key pair rotation . To use key pair rotation with Etleap, follow the steps below:- Generate a new private and public key set using the above commands.
- Assign the new public key to the Snowflake user using the parameter that is not currently in use (either
RSA_PUBLIC_KEYorRSA_PUBLIC_KEY_2). For example:ALTER USER <SNOWFLAKE_USER_FOR_ETLEAP> SET RSA_PUBLIC_KEY_2='<PUBLIC_KEY_GENERATED>'; - Update the private key and passphrase (optional) in Etleap.
- Remove the old public key from the user profile in Snowflake.
ALTER USER <SNOWFLAKE_USER_FOR_ETLEAP> UNSET RSA_PUBLIC_KEY;
Connect with Password Authentication
Please note that connections created this way will eventually need to be converted to use key-pair authentication with a SERVICE user type to align with phase 3 of Snowflake’s MFA enforcement for password authentication .
- Create a new user in your database for the Etleap connection.
The
<user_name>and<password>values will be needed when creating the connection in Etleap.CREATE USER <user_name> PASSWORD = '<password>' TYPE = 'LEGACY_SERVICE'; - Grant the user access to a role that you want to use for Etleap’s privileges.
You may want to create a specific role for this.
CREATE ROLE <role_name>; GRANT ROLE <role_name> TO USER <user_name>; - Grant
USAGEpermission on the warehouse.GRANT USAGE ON WAREHOUSE <warehouse_name> TO ROLE <role_name>; - Grant the following permissions on the database.
GRANT CREATE SCHEMA, USAGE ON DATABASE <database_name> TO ROLE <role_name>; - Grant the following permissions on any schemas that you will load to:
GRANT
   CREATE TABLE,
   CREATE TAG,
   CREATE ICEBERG TABLE,
   CREATE VIEW
ON SCHEMA <schema_name> TO ROLE <role_name>;
If your Snowflake cluster has network policies limiting access by IP addresses, Etleap’s IP addresses can be found in IP Whitelisting.
Configure your Snowflake Connection in Etleap
In addition to the user credentials you created above, you will need to provide the following information when creating a Snowflake connection in Etleap:
- Role - optional: The name of the role you created for Etleap to use for loading data. If not specified, Etleap will use the default role for the user.
- Database: The name of the database you want Etleap to load data into. If you are using this Snowflake connection for Etleap’s dbt integration, this will also be used as the target database.
- Warehouse: The name of the warehouse you want Etleap to use for loading data.
- Schema - optional: The case-sensitive name of the default schema you want Etleap to load data into. This can be changed during pipeline setup or from the pipeline settings page later.
Additional Properties
Grant SELECT Privilege on Tables
You can grant additional roles SELECT privileges on the tables created by Etleap by adding them in the Roles field in the Additional Properties section.
This is useful if you want to allow other roles to have default access to see the data loaded by Etleap.
This field is case-sensitive and must be a comma-separated list of roles. For example: role1,role2,role3.
Use Snowflake as a Source Only
If you are using Snowflake as a source for your pipelines and do not want Etleap to load data into or create an audit table in your Snowflake database, check the Source Only option in the Additional Properties section of the connection setup.
Use a Storage Integration for Load Stages
Etleap uses temporary staging locations in your S3 Intermediate Bucket to load data into Snowflake.
By default, Etleap provides your AWS role and bucket as part of the CREATE STAGE command in Snowflake.
If preferred, or required by your account’s REQUIRE_STORAGE_INTEGRATION_FOR_STAGE_CREATION setting, Etleap can instead reference a Storage Integration when creating the stage.
To set up a Storage Integration for Etleap to use during loads, follow the steps below:
- Follow the steps for Configuring a Snowflake storage integration to access Amazon S3 . Note the following:
- When configuring the role, provide your S3 Intermediate Bucket as the resource. Do not specify a prefix.
- The Storage Integration you create must have an allowed location that specifies the root of your S3 Intermediate bucket e.g.
s3://etleap-intermediate/. - You do not need to create an external stage as part of the configuration steps. Etleap will automatically create stages as part of the load process.
- Grant
USAGEon the Storage Integration to the role used by Etleap.GRANT USAGE ON INTEGRATION etleap_storage_integration TO ROLE <role_name>; - When creating or updating your Snowflake destination connection in Etleap, specify the name of the Storage Integration created in step 1.
Preserve Change Tracking Settings
Etleap supports Snowflake’s Change Tracking feature, which allows you to track changes to your data in Snowflake. When an Etleap pipeline refreshes and recreates the destination table, Etleap preserves the change tracking settings you’ve configured in Snowflake.
During a pipeline refresh, Etleap will detect the current value of the CHANGE_TRACKING and the DATA_RETENTION_TIME_IN_DAYS parameters for the destination table and re-apply these to the new version of the table.